iOS/UIKit
[UIKit][코드베이스] Programmatic UI - UIKit
- -
[참고 영상]
[학습 목표]
버튼 생성과 네비게이션 이동을 코드베이스로 구현해보자.
*외국에서는 코드베이스를 Programmatic이라고 부른다.
[구현 방법]
UIKit 템플릿을 이용해서 Xcode를 실행해보면 StoryBoard가 기본적으로 파일이 있을 것이다.
해당 StoryBoard를 지우고 info.plist와 우측의 찾기 버튼에서 storyboard를 검색해 설정에서 storyboard를 지워주자!


이와 같이 2번의 storyboard 설정을 지우면 SceneDelegate로 이동을 하자.
SceneDelegate의 안에는 가장 윗부분에 scene 함수가 있을텐데 해당 함수 안의 내용을 바꿔주도록 하자.
func scene(_ scene: UIScene, willConnectTo session: UISceneSession, options connectionOptions: UIScene.ConnectionOptions) {
    // Use this method to optionally configure and attach the UIWindow `window` to the provided UIWindowScene `scene`.
    // If using a storyboard, the `window` property will automatically be initialized and attached to the scene.
    // This delegate does not imply the connecting scene or session are new (see `application:configurationForConnectingSceneSession` instead).
    guard let windowScene = (scene as? UIWindowScene) else { return }

    window = UIWindow(frame: windowScene.coordinateSpace.bounds)
    window?.windowScene = windowScene
    window?.rootViewController = UINavigationController(rootViewController: FirstScreen())
    window?.makeKeyAndVisible()
}
밑의 guard let windowScene 이하 부터가 바꾸어진 내용이다.
window?.rootViewController = UINavigationController(rootViewController: FirstScreen()) 는 네비게이션을 사용하기 위해서 쓴 내용이고 단순히 window?.rootViewController = 뷰 컨트롤러 이름 으로 만들경우 네비게이션 기능이 없이 해당 뷰를 실행시킬 수가 있다.
그러면 이제 View Controller를 구현해 보도록 하자!
//UIButton을 하나 만들어 주도록 하자. 다만, 만들었다고 해서 바로 넣어지지는 않는다. 이제부터 이 버튼을 화면에 넣기 위해 코드를 짜보자.
let nextButton = UIButton()

func setupButton() {
	//view안에 버튼을 넣어보자. 다만, 해당 코드만으로는 위치가 원하는곳에 존재하지 않는다.
    view.addSubview(nextButton)

    nextButton.configuration = .filled()
    nextButton.configuration?.baseBackgroundColor = .systemPink
    nextButton.configuration?.title = "NEXT"

	//네비게이션 이동을 위해 있는 내용이다. 네비게이션 이동이 없다면 제거해도 상관이 없다.
    nextButton.addTarget(self, action: #selector(goToNextScreen), for: .touchUpInside)

    nextButton.translatesAutoresizingMaskIntoConstraints = false

    //AutoLayout을 코드로 풀어서 썼다고 생각하면 쉽다. SwiftUI에서의 구현과 비슷하다.
    NSLayoutConstraint.activate([
        nextButton.centerXAnchor.constraint(equalTo: view.centerXAnchor),
        nextButton.centerYAnchor.constraint(equalTo: view.centerYAnchor),
        nextButton.widthAnchor.constraint(equalToConstant: 200),
        nextButton.heightAnchor.constraint(equalToConstant: 50)
    ])
}
처음 접해보면 어렵다고 느낄지도 모르지만 어렵게 생각할 필요는 없다.
AutoLayout을 사용했던 부분이 코드로 온 것이고 storyboard에서 위치를 조정하지 않고 사용할 때 원하는 곳에 없었던 것처럼 약간의 조정을 통해 위치를 조정하자.
만일, SwiftUI를 이미 익혔었다면 함수는 안 익숙하더라도 코드의 짜임새 자체에는 익숙해지기 더 편할 것이다.
이제 해당 내용을 실행하기 위해서 viewDidLoad() 안에
setupButton()해당 함수의 이름을 넣기만 하면 버튼이 넣어진다!
그러면 이제부터 네비게이션 설정에 대해서 알아보도록 하자.
네비게이션 설정의 경우에는 위에 버튼쪽에서 이미 네비게이션과 관련된 구절을 만들었다. 이제 해당 구절을 사용하기 위한 함수를 작성해주자.
@objc func goToNextScreen() {
    let nextScreen = SecondScreenViewController()
    nextScreen.title = "Second Screen"
    navigationController?.pushViewController(nextScreen, animated: true)
}
이와 같은 함수를 작성함으로서 우리는 다음 스크린인 SecondScreenViewController로 버튼을 통해서 이동이 가능하다!
마지막으로 네비게이션으로 이동할 SecondScreenViewControoler에 대해서 구현해보도록 하자.
import UIKit

class SecondScreenViewController: UIViewController {
    override func viewDidLoad() {
        super.viewDidLoad()
        view.backgroundColor = .systemMint
    }
}
간단하게 뒤의 배경만 존재하는 클래스를 만들어 주었다.
[전체 코드]
FirstScreen.swift
import UIKit
class FirstScreen: UIViewController {
let nextButton = UIButton()
override func viewDidLoad() {
super.viewDidLoad()
setupButton()
view.backgroundColor = .systemBackground
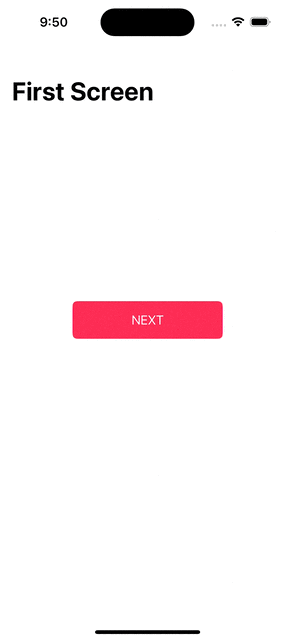
title = "First Screen"
navigationController?.navigationBar.prefersLargeTitles = true
// Do any additional setup after loading the view.
}
func setupButton() {
view.addSubview(nextButton)
nextButton.configuration = .filled()
nextButton.configuration?.baseBackgroundColor = .systemPink
nextButton.configuration?.title = "NEXT"
nextButton.addTarget(self, action: #selector(goToNextScreen), for: .touchUpInside)
nextButton.translatesAutoresizingMaskIntoConstraints = false
NSLayoutConstraint.activate([
nextButton.centerXAnchor.constraint(equalTo: view.centerXAnchor),
nextButton.centerYAnchor.constraint(equalTo: view.centerYAnchor),
nextButton.widthAnchor.constraint(equalToConstant: 200),
nextButton.heightAnchor.constraint(equalToConstant: 50)
])
}
@objc func goToNextScreen() {
let nextScreen = SecondScreenViewController()
nextScreen.title = "Second Screen"
navigationController?.pushViewController(nextScreen, animated: true)
}
}SecondScreenViewController.swift
import UIKit

class SecondScreenViewController: UIViewController {

    override func viewDidLoad() {
        super.viewDidLoad()
        view.backgroundColor = .systemMint
    }
}
SceneDelegate.swift
import UIKit

class SceneDelegate: UIResponder, UIWindowSceneDelegate {

    var window: UIWindow?


    func scene(_ scene: UIScene, willConnectTo session: UISceneSession, options connectionOptions: UIScene.ConnectionOptions) {
        // Use this method to optionally configure and attach the UIWindow `window` to the provided UIWindowScene `scene`.
        // If using a storyboard, the `window` property will automatically be initialized and attached to the scene.
        // This delegate does not imply the connecting scene or session are new (see `application:configurationForConnectingSceneSession` instead).
        guard let windowScene = (scene as? UIWindowScene) else { return }

        window = UIWindow(frame: windowScene.coordinateSpace.bounds)
        window?.windowScene = windowScene
        window?.rootViewController = UINavigationController(rootViewController: FirstScreen())
        window?.makeKeyAndVisible()
    }

    func sceneDidDisconnect(_ scene: UIScene) {
        // Called as the scene is being released by the system.
        // This occurs shortly after the scene enters the background, or when its session is discarded.
        // Release any resources associated with this scene that can be re-created the next time the scene connects.
        // The scene may re-connect later, as its session was not necessarily discarded (see `application:didDiscardSceneSessions` instead).
    }

    func sceneDidBecomeActive(_ scene: UIScene) {
        // Called when the scene has moved from an inactive state to an active state.
        // Use this method to restart any tasks that were paused (or not yet started) when the scene was inactive.
    }

    func sceneWillResignActive(_ scene: UIScene) {
        // Called when the scene will move from an active state to an inactive state.
        // This may occur due to temporary interruptions (ex. an incoming phone call).
    }

    func sceneWillEnterForeground(_ scene: UIScene) {
        // Called as the scene transitions from the background to the foreground.
        // Use this method to undo the changes made on entering the background.
    }

    func sceneDidEnterBackground(_ scene: UIScene) {
        // Called as the scene transitions from the foreground to the background.
        // Use this method to save data, release shared resources, and store enough scene-specific state information
        // to restore the scene back to its current state.
    }


}
환경설정만 만져보면 생각보다 간단하게 구현된다는 것을 알 수가 있다.
왜 우리는 StoryBoard가 있는데 코드 베이스로 구현을 해야 할까?
코드 베이스는 협업을 할 때 상대방의 코드를 이해하기가 더 쉽고 (코드베이스가 줄이 더 길다고 느낄 수 있지만 깃허브에 올려보면 상대방의 스토리보드 줄이 얼마나 긴지 체감할 수가 있을 것이다.)
Conflict의 가능성을 조금 더 낮춰준다.
마지막으로 개인적으로 상대방의 브랜치를 가져온 뒤에 storyboard를 사용해서 하나하나 모든 체크를 확인 하는 작업이 굉장히 수고롭다고 느꼈다. 이제 우리 모두 코드베이스를 활용해서 앱을 개발해보자!
* 위에서도 말했지만 영어권에서는 코드 베이스를 programmatic / programmatically 라고 부른다. 자료를 조사할 때 코드 베이스라고 쓰지 않도록 주의하자.
'iOS > UIKit' 카테고리의 다른 글
| [UIKit][코드 베이스]CollectionView Context Menus (0) | 2022.11.10 |
|---|---|
| [UIKit][코드 베이스] UIKit에서 Zstack 구현하기 (0) | 2022.10.13 |
| [UIKit][코드베이스] Drag and Drop Picture (2) | 2022.10.07 |
| [UIKit] Drag & Drop CollectionView Cells (코드베이스) (0) | 2022.10.06 |
| [UIKit] Simple Drawing App with PencilKit (0) | 2022.10.04 |
Contents
소중한 공감 감사합니다